“Welcome, Swift enthusiasts! If you’ve landed on this article, it’s likely for one of two reasons:
- Rapid Implementationof Async Await: You’re on the hunt for a quick guide that allows you to swiftly integrate
async/awaitinto your code. - Deep Dive into Async Await: You have a thirst for knowledge and aim to delve into the intricacies of
async/await, unraveling its nuances and complexities.
“No matter what you’re looking for, you’re in the right spot. This article will give a clear and straightforward guide for those wanting to quickly use async/await. And if you’re hoping to learn more, keep an eye out! We’ll have a detailed article coming up to cover everything you want to know.”
Async/Await
- A structured way of achieving concurrency for asynchronous methods in swift
- Easy to understand
- Easy to write
You need to know only two keywords Async and Await to write a swift concurrent code in asynchronous manner
Why Async/Await?
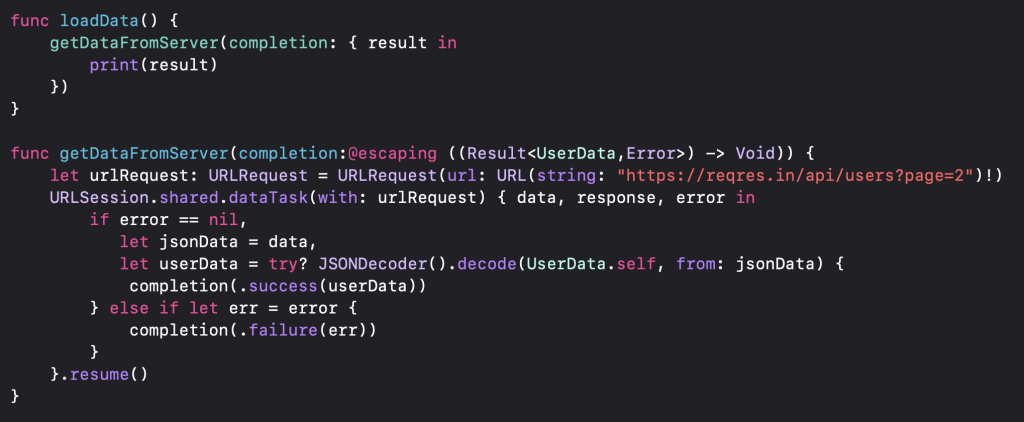
In many of our iOS projects, we consistently encounter the need for asynchronous operations and mostly these operation needs to be performed on background thread to utilise full power of concurrency. One such operation that we frequently implement is fetching user data. Let’s delve into the code that facilitates this operation and explore opportunities to refine and optimise it.

This is a generic API call that we always use in our code, below are the some important observations regarding the code.
- During our response processing, we initially verify the absence of an error and the presence of data. We then employ an “if let” construct for the error. However, complications arise when both error and data return as nil; our completion handler remains uninvoked. Introducing more conditions only amplifies the difficulty in consistently managing these handlers.
- As evident from the code, the use of completion handlers complicates both their declaration and implementation, making them less intuitive.
To solve these problems Swift concurrency introduced Async/Await.